Section outline
-
Teams Tip of the Day

-
Today’s tip gives you a brief but handy overview of the Activity feed in Microsoft Teams. Take a look at the link:
-
Are you ready to take your use of Microsoft Teams to the next level? Well look no further than this link:
-
Microsoft Teams is great! But think before creating another one... a private channel in an existing Team might be better. The link below explains all the details but only the people you add to the private channel can see it. You get all the functionality of a Team, without needing to create a whole new one. As well as being able to share comments and documents privately. This could be useful if you need certain groups of learners to work on projects within Teams but need to ensure they are working separately.
Don’t forget that chat is also another option. If you want to discuss things/share files with one person or a small group of people, then you can set up a ‘chat’. You can give that chat a name to make it stand out, you can also pin important chats to the top of your screen on desktop/laptops. You can still call / video in the chats, so has many similar functionalities as a Team.
So you may not need another Team or you may be able to minimise some that you do have!
-
CSU Top Tips for using Channels in Teams
- Channels play a big part in using Teams effectively but are often overlooked, meaning staff end up creating multiple Teams with a single channel where a single Team each with multiple channels would be more effective (we have over 1,000 Teams already!). Please read on…
- In each Team you can create 200 standard channels visible to all Team members, and 30 private channels visible only to Team members you choose to add to the channel. For example, consider a College department/team/area using a single Team with multiple channels for shared topics and a separate private channel for each sub-team or working group that needs keep information restricted to only members of the channel (e.g. for confidentiality or GDPR compliance).
- Use the General channel for Team-wide announcements, and use other channels for topic-related channel posts & files. This ensures everyone can see announcements easily without them getting lost in other chat (a Microsoft best practice recommendation).
- You can @mention a channel by name in the same way you @mention a Team member or @mention the whole Team by name. Members of the channel will receive a notification. If it’s a standard channel, other Team members will still be able to browse to the post if they wish but they won't be notified unnecessarily.
- When composing a channel post you can you change the post type from 'New Conversion' to 'Announcement' to really make it pop out. Click in ‘Start a new conversion’ then click ‘A’ below it (Format option) and click the ‘New Conversation’ pulldown to change it to ‘Announcement’ (don’t forget to @mention in it too).
- When replying to a post, click Reply on the post you wish to reply to. If you click ‘Start a new conversation’ at the bottom posts window instead you will start a new separate conversation for each reply which makes channel posts a lot harder to follow (this is very common mistake).
- When creating a new meeting for Team members, make sure you use the Add channel option to select the channel relevant to the meeting. A post will be automatically added to the channel with meeting information, included meeting chat, meeting notes (another feature) and attendees present. You can easily find the meeting post in the channel to check chat, notes, remind yourself if you attended, and more. If a meeting is set to repeat, the same post will be updated each time.
- An existing channel can't be changed between standard to private later, so if you think you will need to restrict the channel later, create it as private now and remove individual members later if needed.
-
In order to avoid a proliferation of teams, it’s really useful to be aware of what channels are for. This link should clarify things:
-
I’ve picked out another course from the Microsoft Educator Centre for you today. This one is called ‘Supporting Learning Initiatives with Staff Teams’ and here’s the link:
-
Did you know you can share your screen on a Team’s call? You can share your desktop, a particular page or a PowerPoint. Handy if you’re in a more formal meeting and you don’t have the use of the interactive whiteboard. You can even share control of your screen with another member of your chat. Here is a link to show you how to do it
I share quite a lot in group and 1:1 meetings so take a look and have a go if you haven’t already done so.
-
“If you are in a Team where you don't need updates from all the channels, then you can minimise what you see! This makes it a little easier to manage
If you hover over the channel and click on the three dots, you see a variety of options:
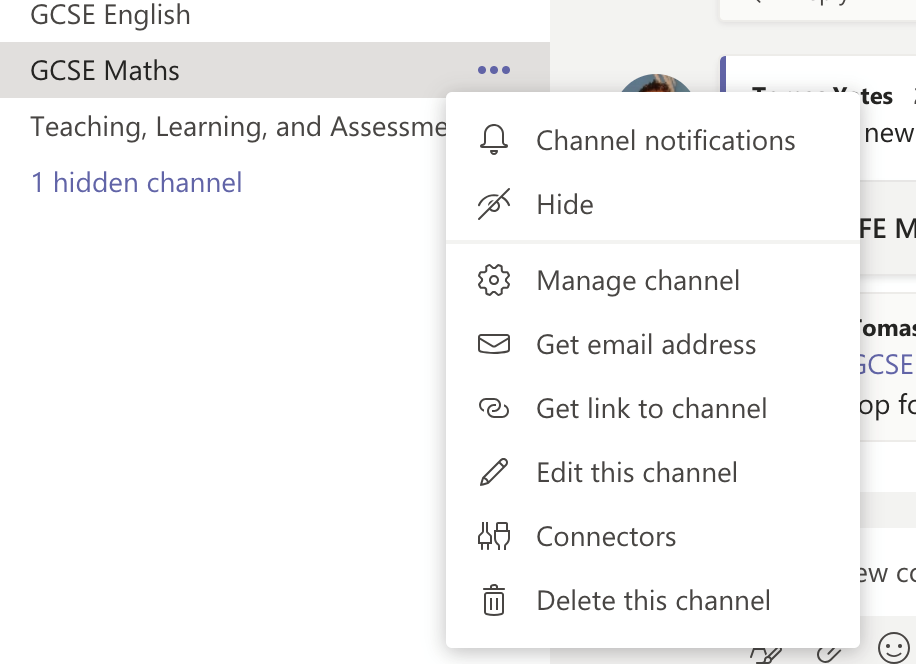
- one option is 'hide' - which hides the channel - if you hide a few channels, they all get hidden in one row which makes it much clearer for you. But only hide if you really don't want information from that channel otherwise you might miss out!
- another option is to change notifications - click on 'channel notification' - here you can decide what you get for all new posts and for channel mentions
- a channel mention is when the person posting uses the @ followed by the channel name, so that everyone in that channel gets a notification (normally a red dot with a number) without that, normally the channel name just goes bold to show you there is new activity but you or the channel haven't beed tagged.
- you can change the settings to
- off- ideal if that channel is not relevant to you, helping you to prioritise information from other channels that are important and stopping you get bombarded!
- only show in feed - this is your 'activity feed' - see the bell icon top right of desktops/laptops. This helps you find all types of activity across all Teams!
- show in banner and feed - the banner is when a notification pops up on your desktop, normally bottom right of screen. This is really helpful for items that are important to you but is distracting for channels that don't relate to you.
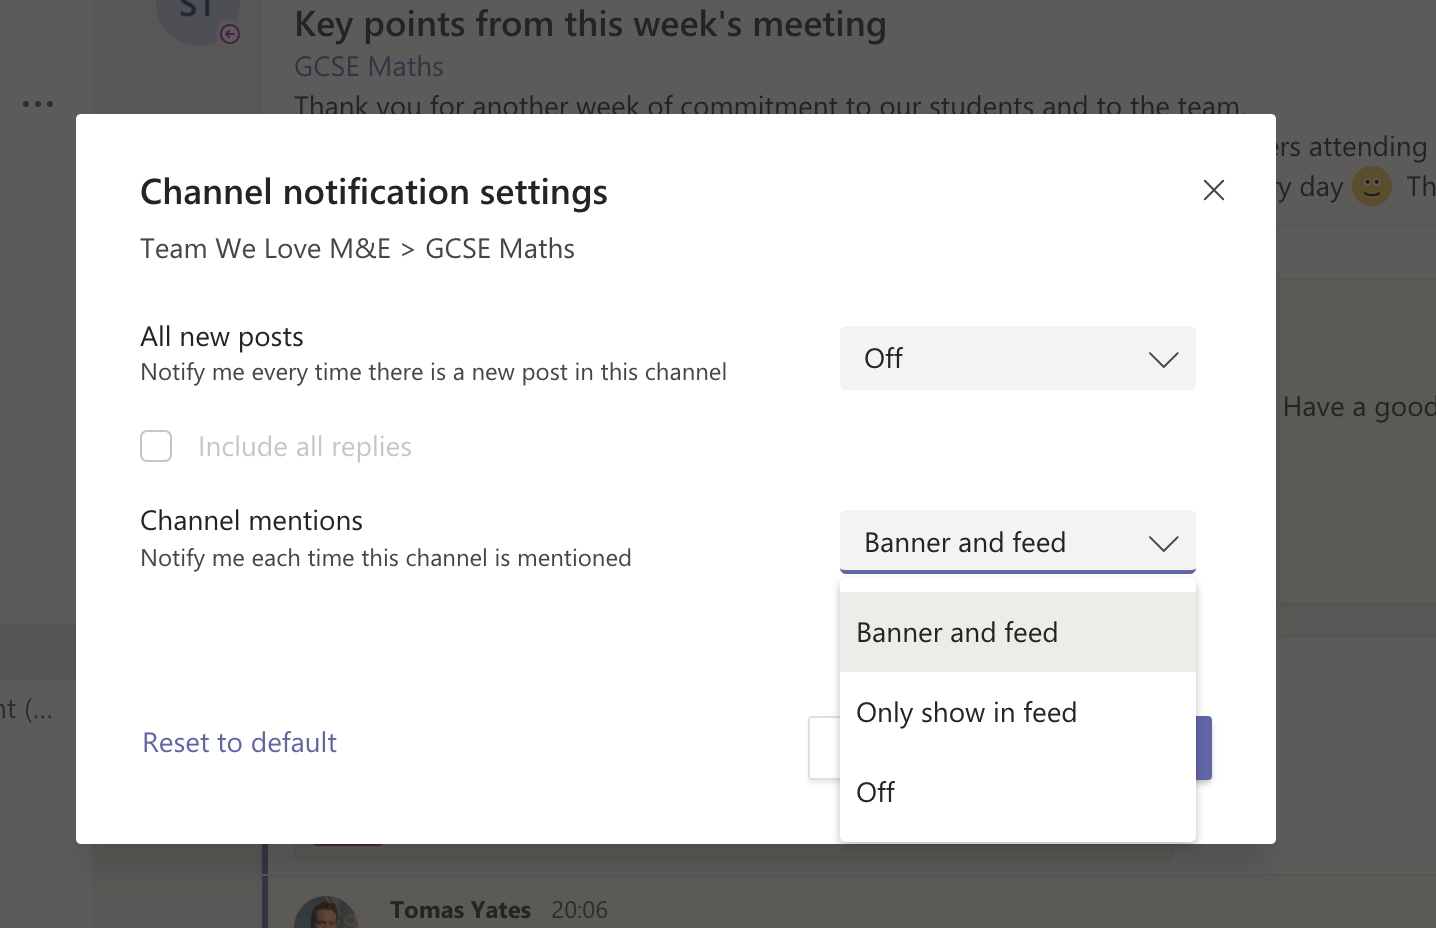
So it is worth taking a few moments to set the notifications to what works for you - it can make a huge difference in helping you focus on what matters and to not get distracted by what doesn't!
I have tried to give a simple explanation but here is the link to the official guidance as it also contains some other useful bits of information.
-
Do you want to transform learning with Microsoft Teams? I thought so! Take a look at this link:
If you haven’t done so already, sign up for the Microsoft Educator Centre. You can select the most appropriate CPD for you and it logs everything for you. Completing this one will earn you a whopping 500 points!
-
Have you ever used the Microsoft Educator Centre? There’s a huge amount of resources and courses that you can do. See below for a link for a short course on ‘Crafting a Collaborative Learning Environment with Microsoft Teams’:
I haven’t looked at this one myself but there may also be some great resources available to help Business Support teams. You can create an account that keeps a log of all of the CPD you have completed. Well worth a look!
-
Take a look at this link for some tips on working at home using Teams. This isn’t a ‘how to use Teams’ guide but might be useful for those of us still adapting to working in a different environment.
Just enter your name and email address and you will be able to watch the video.
-
Did you know how useful the search bar at the top of your screen is?
- You can you search for items - and this is clever too because if you can't recall the name of the document, it searches the body of the document too, so you can use words that you think might be in it to help find it! Or where was that conversation you had with someone - which Team?! It really helps to take the stress out of it!
- type a word you want to search for - you will then get three options:
- messages
- people
- files
- so that word could be in a conversation and you need to find it again or in a document you are looking for!
- You also have 'quick commands'
- click in search bar
- it reminds you that you can put in the / to get the list of quick commands
- just start writing one and it will give you the options and you can click on it
- a favourite of mine is /unread - and it brings up any notifications, messages etc that you haven't yet dealt with from any of the Teams that you are in! Never miss anything again 🙂
-
A useful tip for communication between MS Teams and Outlook...
This is handy for various reasons but it is a nice way to be able to discuss and plan actions based on the email, live without the need for lots of emails going back and fourth. This allows for a much smoother discussion as opposed to a more disjointed conversation about the email.”
-
Please find attached video link to 'How to mark assignments in Teams'
It is so easy and it is great that you can have the document on the left and feedback on the right on your screen as you mark it.”
-
This will improve the experience of meetings and live lessons on Teams:
-
I am coming across students and parents who don't understand Teams and why it would be relevant and how they access it. I have come across three short clips that may demystify this for them.
-
I was talking to Carl Ward yesterday about the use of channels in Teams so I have included this link for you:
-
Within your Microsoft Team you can add new tabs. Tabs are useful for organising your content and ensuring key documents are easily accessible. There are a range of apps which can be integrated with Teams. The addition of a Microsoft Form for recording feedback or Team OneNote for shared note taking or the addition of a PDF with the specification for the course exam board are examples of useful tabs people may wish to experiment with.
As well as tabs you can add extra channels. Channels are another great way of organising content and can also be used to restrict content to select Team members. Channels with restricted access are indicated by a padlock symbol (see screenshot). An example could be to have a Team for the department but separate channels for courses or clients/partners depending on which members of the department are actively involved with that course/client.
-
In addition to my previous tip about being able to blur your background, Microsoft have developed this further over Easter by giving you extra background effects when using a Windows or Apple computer to call into a scheduled meeting. In addition to the blur effect you can have professional business like backgrounds as well as a range of more playful backgrounds such as party balloons or the surface of the moon. I've had good fun circulating through these in recent meetings.
-
It is around 17 minutes but does show nicely different ways to set up meetings, including some very useful tips re: who controls a meeting. It is also interesting as it shows you that you can set up meetings in teams but for people outside of the organisation and even for those who do not have Teams – but they can still join in the meeting!
-
Is the chat area visible to the whole Group?
Yes, everyone within the Team or group chat can see the messages posted and contribute to the conversation. For 1-1 conversations open a new chat, inviting that individual.
What happens when I add @ in front of someone’s name?
It shows the message is intended to be seen by a specific person or people. If they have not seen the message Teams will send them a notification. Everyone within the chat will be able to see the message and be able to contribute to the conversation. Adding @ in front of a name does not make the conversation private.
What should I be mindful about when sending messages through Teams?
Remember this is a business communication tool and you should therefore refrain from non-work related topics. The same etiquette standards should apply to Teams as they would when sending a work email or having a telephone coversation with colleagues or students.
It is also important to remember Teams data is subject to data protection requests and freedom of information requests so do not type anything you wouldn’t be happy to say directly to that individual.
What about confidential information?
Refer to the CSU where to save guide on ChiDrive for advice on where different documents should be stored. It references Microsoft Teams.
You can store data in Teams intended for public viewing.
Being conscious of who is part of the Team you can also store private (need-to-know basis) and confidential (personal or commercially sensitive data) documents in Teams.
Teams is also the ideal platform to hold interviews over video call or discuss the next steps in your department’s ongoing projects.
You should not store personally owned data including music, videos and images or information not compliant with Group policies or copyright licenses within a Teams site.
___________________________________________________________________________________________________
-
A few members of staff have asked for a general overview of what Teams can do and the link below will show you a really useful video.
-
If you feel like praising some of the amazing efforts of your colleagues then check out this link to see how you can do it on Teams:
-
I’d like to highlight how great Teams is for audio and video calls one on one or with colleagues or students. When sending a diary invite using Outlook you can make it an online meeting to add a join button from within the diary invite.
Better yet, once in the call you can continue to set the boundaries between the office and home life by bluring our your background. A guide on how to do this is here
-
We talk a lot about our well-being at work but the same applies at home and the last thing we want are notifications when we’re trying to relax. Here’s a tip to help:
Set quiet hours to mute notifications
At the top left of the app, tap
 > Notifications > Quiet hours > Toggle Daily quiet hours on.
 -
A useful list of FAQs. Some of this does refer to students but is equally applicable to business support teams holding meetings and needing to share presentations.
-
It’s time for Teams again! I’m conscious that many of us are getting used to a new way of working so I’ve got something different for you today.
Please click the link below to take you to a video. It’s 60 minutes but should give you a number of basic tips on how to get started - plenty for curriculum and business support teams here!
-
Using Tags to Target your Notifications
Microsoft Teams can help you to ensure that you can get your messages and notifications to those that need to see/hear it with the use of tags. Please note that this can only be done if you are an 'owner' within a Team:
- In Microsoft Teams, select Teams
 on the left side of the app and find your team in the list.
 - Select the More options
 and select the Manage tags
- Now you can create new tags and attach specific people from within the team to that tag. You can also manage existing tags in this same section.
- You can then use the tag in the same way that you could mention specific people and teams in yesterday's teams tip with the use of the @ sign directly in front of the tag name.
- In Microsoft Teams, select Teams